If you’re new to photography and recently bought a camera, you’ve probably wondered which camera mode is best for wildlife photography. Right?
Well, from my experience, you need to combine three camera modes shutter speed, aperture, and ISO for the best camera mode for wildlife photography. However, there’s much more to it.
In this article, I’ll be going all over camera modes in wildlife photography and giving some tips. So without further ado, let’s get started!
Best Camera Setting For Wildlife Photography
Even though there’s no single best camera setting for wildlife photography, there are three settings you should consider turning on. These three are listed below:
1. Aperture
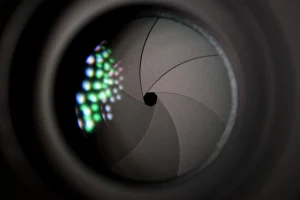
The aperture is the size of the opening in your lens when you take a picture. A higher aperture means less space, while a lower aperture means more space.
For example, high/narrow aperture settings like f/16 will capture more light while taking a picture. This will make your photos look wide and will increase the depth of field.
Wide apertures such as f/2.8 give off a shallow focus effect making the subject of the image sharp and the background blurry and out of focus. This effect works best for capturing a sharp image of one animal at a time.
2. Shutter Speed
Having the correct shutter speed is the second most important setting when it comes to wildlife photography. Shutter speeds determine how much time light can hit your camera sensor when a photo is taken.
High shutter speeds such as 1/2000 would freeze the moment instantly, letting you take sharp pictures of fast-moving animals.
Slower shutter speeds such as 1/50 aren’t sharp and are better for animals that are not moving.
Depending on the type of animal you’re photographing, you should set your shutter speed between 1/50th to 1/2000th
3. ISO
The ISO setting of your camera determines the brightness of your photos. ISO doesn’t directly change the brightness when a picture is taken, but instead changes it after the picture is taken, similar to photo editing software.
However, setting a high ISO for bright photographs in low sunlight isn’t going to work, as it’ll make the photos have less color and look dull.
What Is The Best ISO Setting?
Now that you know about the best settings, let’s look deeper into the ISO setting as it’s one of the most important features.
From my experience, I found the best ISO setting is a value of 100. It gives off sharp images with great lighting and shadows. On the other hand, values such as 1000 have lower quality and look too bright.
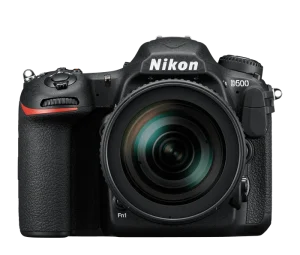
Source: nikonusa.com
The Nikon D500 has one of the highest-performing ISO on any camera, you should check it out if you take pictures in darker areas.
Depending on the lighting of your area, you might need to change the ISO from time to time. However, it’s usually within ISO 100-200 for most lighting areas.
Is Auto ISO Good For Wildlife Photography?
By now, it’s easy to understand how important ISO is for wildlife photography. But if you’re new to photography, you might have tried using the Automatic ISO feature.
But from my experience in photography, I think the Auto ISO feature is very flawed, and it’s wont work most of the time.
It’s often seen the mode will use the wrong values for the aperture and ISO, and it’ll be too bright or too dark. Most of the time, the ISO won’t change properly even under the proper lighting conditions.
How To Combine All Three Camera Settings
Now that you know all about the three best camera settings and what not to use, let’s take a look at how to combine them for the best wildlife photos.
Although there isn’t a single best combination of the three settings for every scenario, there are two universal combinations that work on two common scenarios.
For areas with higher light levels and enough exposure;
You should have high shutter speeds such as 1/2000, f/16 aperture, and 100 ISO.
For darker areas;
You should have a wider aperture of f/2.5, longer shutter speeds such as 30 seconds, and 200 ISO.
It’s always recommended to keep your shutter speed high, for both dark and light areas. However, always change the duration of the shutter speed in darker areas to 15 – 30 seconds.
Aperture Priority
Most people use Aperture Priority mode and it’s said to be the best camera mode for wildlife photography. It’s better than shutter speed since you can change it whenever you want faster, and more efficiently.
For low light levels;
You can change it to something like f/2.8, f/4, or f/5.6 on most camera lenses.
For the dark areas;
I usually only increase my ISO to 1000 to get a fast shutter speed.
Personally, I always keep my aperture at f/5.6 and only change the ISO to 800. But If you want to automate this process of increasing the ISO, you can turn on the Auto ISO dialogue option on your camera.
Shutter Speed Priority
The second best thing for Aperture Priority is Shutter Speed Priority. Many wildlife photographers prefer Shutter Speed Priority, but it’s less intuitive to use.
A lot of the time, picking Shutter Speed priority can change the aperture value of your camera too much. This is most commonly seen to happen in dim conditions, and the ISO value turns higher than your camera can handle.
What Mode Do Most Photographers Shoot In?
Even though there are three best camera settings, people have different opinions when it comes to the best camera modes for wildlife photography.
But most photographers use either the Aperture Priority mode or the Shutter Speed Priority mode.
Overall, if you’re a beginner it’s recommended to stick with Aperture Priority. It’s much easier to deal with and needs less experience.
Best Metering Mode For Wildlife Photography
Spot metering is the most common and best metering mode for wildlife photography.
This mode helps the camera focus on only the center of the image, and it helps you have the proper lighting for the subject animal of your photo.
Best Autofocus Mode For Wildlife Photography
Having a good Autofocus mode can get rid of unnecessary blur whenever you’re taking pictures. The most common Autofocus modes are the small Autofocus box and the Wide Autofocus box.
Wide Autofocus box;
The wide autofocus box has a big focusing area, and it usually makes errors and tracks into terrain instead of the subject.
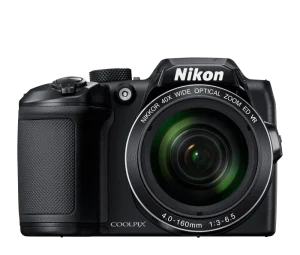
Source: nikonusa.com
This feature is usually found in most cameras including the Nikon Coolpix B500, but it’s recommended to not use the feature.
You should check out the small autofocus mode instead. It has a small box where the camera will focus, reducing the chances of focusing on unnecessary areas.
Small Autofocus Box;
The small box autofocus gives off a sharp focus effect on the main subject with good lighting and shadows while blurring the background perfectly.
Whether you’re new or experienced, the small box autofocus is the best focus mode for wildlife photography.
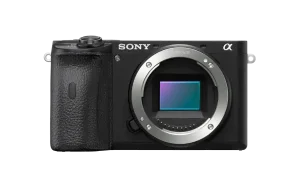
Source: electronics.sony.com
This feature is seen on the famous Sony Alpha A6600 Camera.
Conclusion
Hopefully, now you know all about the best camera modes for wildlife photography. Setting up a camera for wildlife photography is usually easy, and you’re only required to change 3 settings and 1 mode.
As a final tip, I’d recommend you use a long lens whenever you’re taking pictures of wildlife. Long lenses combined with small box autofocus usually capture the best pictures with no vibrations or unnecessary blur.
But with all that being said, good luck on your wildlife photography journey, cheers!
Justin Parker is a professional photographer and has been in the industry since 2007. He attended the University of Georgia. Justin combines his passion for photography and his interest in writing to give life to this blog which talks about photography in order to help and inspire young photographers.