Toys are enjoyed not just by youngsters but by adults. With figurines and other characters like movies, shows, comics, anime, etc., appearing in various sizes, toys have already been filling the market for decades, so there is a rising number of toy lovers throughout the globe.
Some individuals collect them, while many photographers take full advantage of these figures and utilise them for photography. This essay will look at several unique approaches and strategies for toy photography.
Is Toy Photography A Job?
Toy photography career. Photojournalism has become a profitable and exciting career choice for many teenagers as the advertising, media, and fashion industries have increased.
Until a few years ago, most people thought of photography as a pastime, but it has become a full-fledged career today.
What Type Of Equipment Does A Toy Photographer Need?
- Make Use Of A Tripod
Toy photography requires a sturdy camera as the initial step in the learning process. Dealing with a bit of things is already a problem when photographing toys.
Make sure you capture all of the toy’s moods and activities in great detail to make it look more lifelike. A tripod ensures that your photos are free of camera wobble and blur.
The movement of your hand may prevent you from getting the shot you want when you set up your whole set and attempt to take it all via your camera at once.
Using a tripod allows you to take clear, focused photos.
- Objects And Setting
Putting a scenario together doesn’t need much time or money spent on elaborate props. Toys are much smaller than actual models. Because of this, the backdrop area they cover should be small.
Your toy photography session may be completed entirely inside a baking pan! Props might vary depending on the scenario you’re attempting to create, but they don’t need to be excessive.
A Superman figure plus a handful of branches, twigs, and leaves from your backyard are all you need to get the photo of Superman in the jungle.
Get your baking dish or whatever you’re using for your setup and put these items in it. Then all you have to do is click on the photographs.
- Control The Lights
Toy photography requires a lot of light. These aren’t your average white and yellow lights, though.
Photographers often use red, blue, and neon lights to enhance the appearance of their images. Your illumination should be in sync with the angle at which your toy is standing.
You don’t have to buy several lights to photograph your toy in various lighting conditions. On Amazon, you’ll find many color-changing bulbs and lights that you can control with your smartphone.
Any material that disperses light, such as transparent plastic bottle caps or clothing, may be used as a substitute for expensive equipment. Let the magic begin when you place this colorful fabric in front of the camera or smartphone’s lens.
Your toy photography’s lighting effects significantly impact the details and atmosphere you’re trying to convey.
- You’ll Have A Variety Of Options Via Framing
If you want to capture the emotions and stance of your toy figure, proper framing is essential. Close-ups, half-lengths, and full-lengths may be used while shooting toy figurines.
Characteristic facial expressions and postures may be captured in close-up feature photos of toy figures.
When photographing figurines like Batman’s Joker and action heroes such as John Wick, focus on the figurine’s individuality.
- The Camera’s Exposure Compensation
When photographing a toy, the camera’s settings must also be ideal. When we speak about camera settings, we’re talking about the shutter, aperture, ISO, and white balance measurements.
These elements come together in perfect harmony to produce a stunning shot of the highest caliber. Using a shallow depth of focus is essential for toy photography. Because of this, you’ll have to concentrate just on toys and obscure the rest of your surroundings.
The depth in field emission may be used to achieve this. Reduce the f-stop and raise the shutter speed to get this effect.
Take care not to exceed ISO 300 while using your camera. Depending on the light source, you may adjust the white balance or leave it in automatic mode for better photos.
Go to aperture priority mode (Av) to get the best results while photographing toys; go to aperture priority mode (Av).
Best Camera For Toy Photography
- Nikon D3500
A long-time favorite of ours, the Nikon D3500 is an excellent camera. Even though it isn’t the most complex DSLR on the market, the ease of use, settings, and picture quality it produces makes it our top pick for photographers just getting started.
Many features of the D3500 are missing, including a touch-sensitive back screen, hybrid on-sensor autofocus, and 4K video recording.
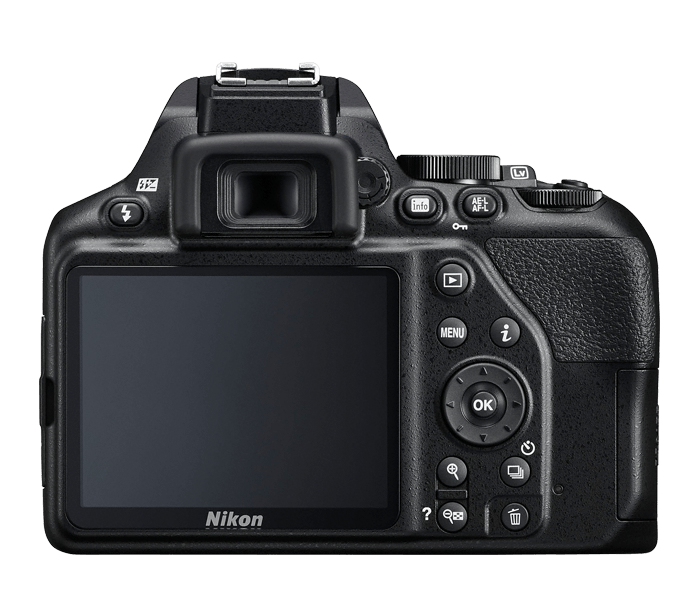
This newest AF-P retractable kit lens is a minor miracle that focuses quickly in live view, with or without on-sensor phase-detection autofocus on the 24-megapixel sensor.
The D3500 is a great camera to get your feet wet with interchangeable lens shooting if you’re getting into photography.
- Fujifilm X-S10
Despite the lack of external exposure adjustments on the Fujifilm X-S10, it’s evident that this is no “amateur” camera in any way, shape, or form. Because of its high-quality construction and responsiveness to the driver.
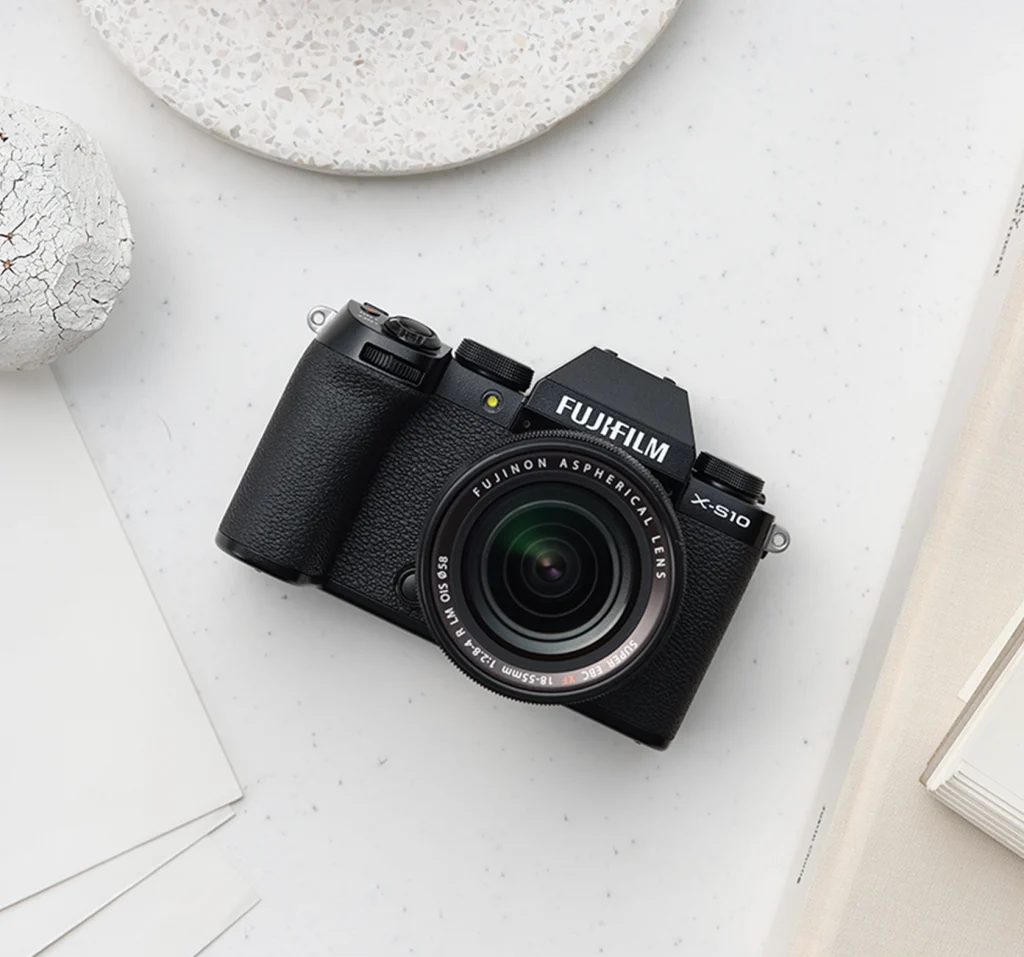
A conventional mode dial may disappoint the Fujifilm fan base. Still, the camera’s excellent finish, great build, and handling, as well as the participation of IBIS make it very appealing to a wide range of photographers, especially at this price point, making it the best APS-C mirrorless camera currently available for performance, quality, and value.
Another argument for why we prefer the X-T40 over the X-T30 is the camera’s adjustable back screen. This is an excellent option if you’re coming from a DSLR or mirrorless camera.
Toy Photography Lenses
Use a wide-angle lens, such as a 24-105mm lens; we favor this kind of camera.
To avoid the need for focus stacking, make sure your models are large enough and photograph at an aperture of 11–32 f/stops before deciding on your focal length.
Best Light For Toy Photography
If you’re just getting started with toy photography lighting, you’ll soon know what equipment you need to achieve the best results.
- Lume Cube 2.0
When you consider the Lume Cube 2.0’s pricing, it’s hard to comprehend how much it can do for you. Under $90 yet with a list of features that match the most expensive.
Toy photographers searching for a portable, low-cost option should check this out.
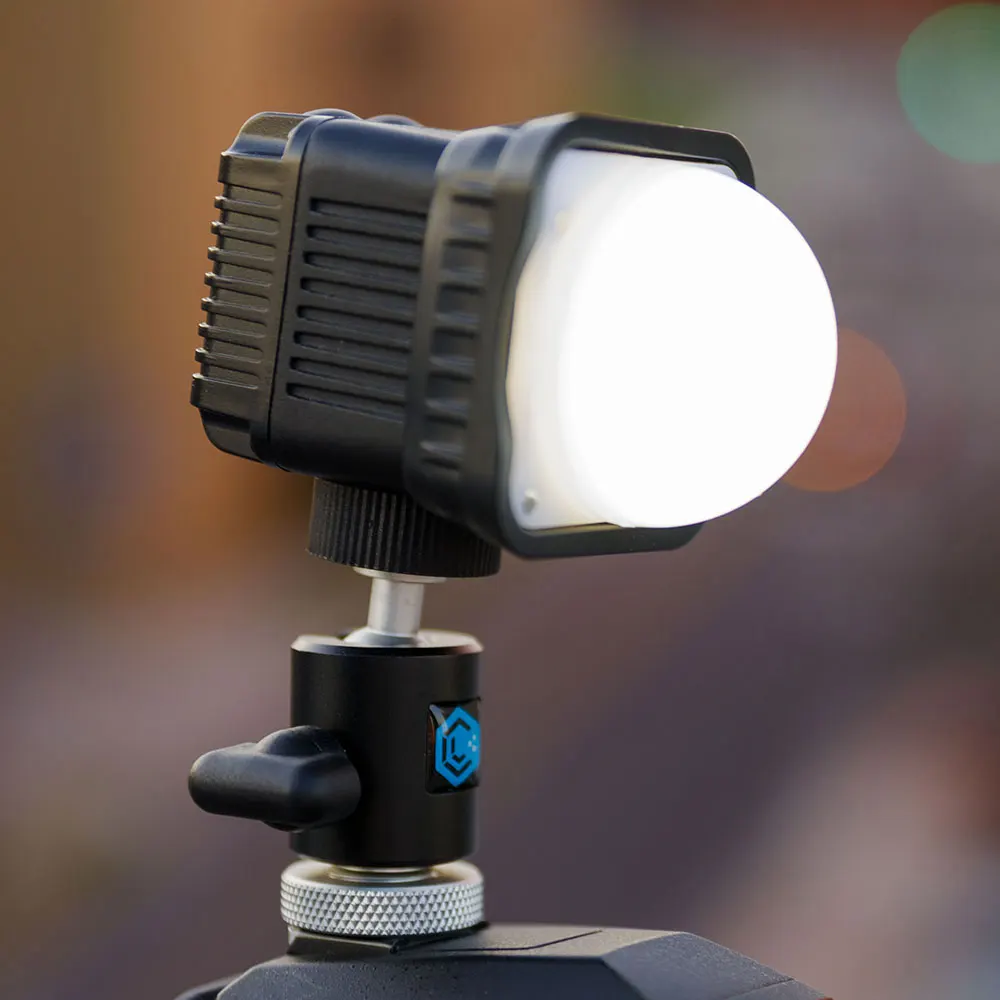
You can change the brightness level of the 5600K daylight-style illumination using the internal controls. Brightness may be adjusted in 10% intervals to get the perfect daytime look in your photographs.
This Lumb Cube 2.0 features a Bluetooth Wireless connection and an app that may be used to operate the device. You may customize your camera’s brightness, flash setting, and more using this software.
With a USB-C port, it recharges its internal battery. 1.5 hours of continuous program execution off maximum brightness setting and 3 hours of continuous run time at half brightness.
Take as many pictures as you like; there are plenty of opportunities.
- ULANZI VL49
If you’re on a tight budget, the Ulanzi VL49 is the most incredible toy photography light, costing only $25.99.
Do not be deterred because of the high cost. It’s excellent for newbies who don’t want to spend a lot of money to get started with lighting.
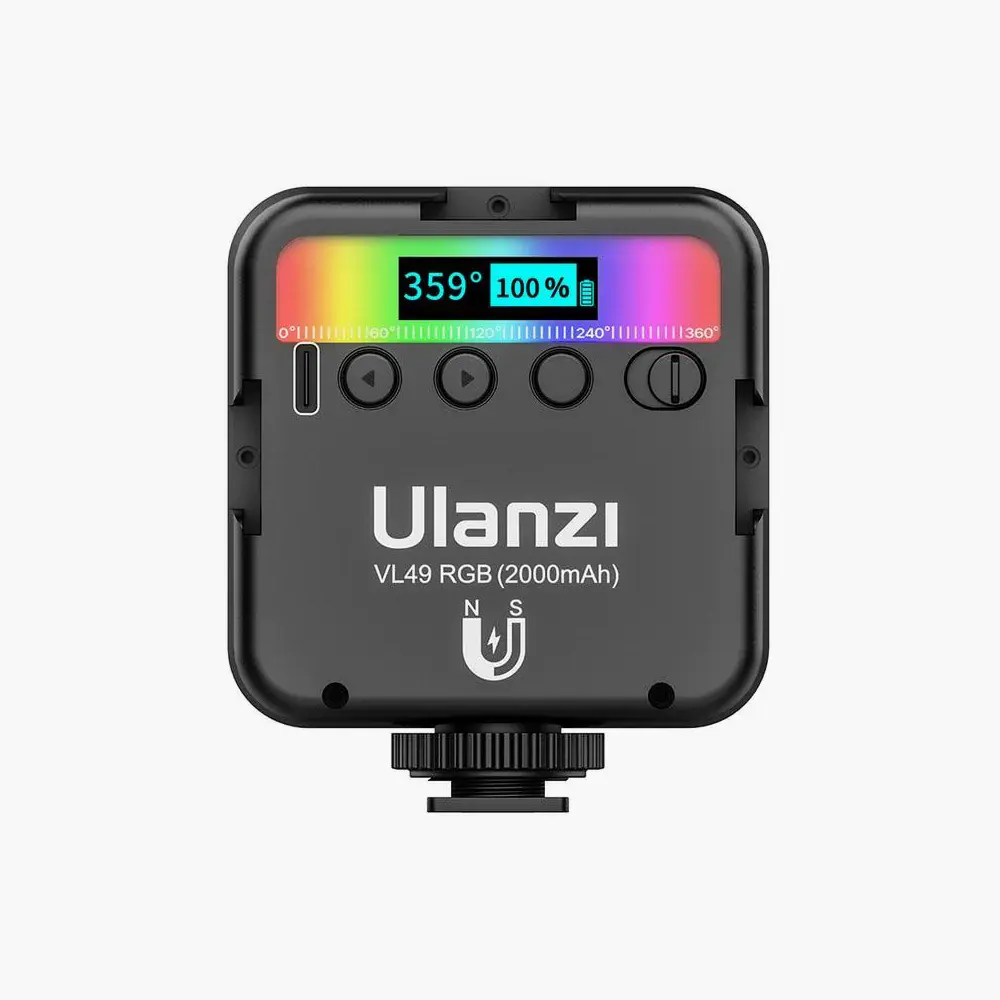
The VL49’s fighting style is gentle yet brilliant. Bright lights may produce a sharp glare, but this lightboard diffuses light to make it look more pleasant.
As a result, your subject will be free of distracting glare when photographed.
You can get up to 2 hours of usage out of the 2000mAh inboard battery; at the lowest brightness, you can get up to 5 hours of use. But even though it’s inexpensive, it’s constructed to withstand such long-term productions.
While keeping all of the subject’s original color, the 5500K sunlight temperature may also be dimmed. If you choose this light and natural appearance, you’ll spend less time in post-production color grading.
Toys Photography Backgrounds
- Simple Backgrounds
Occasionally, you’ll want to keep the background as plain as possible so that it doesn’t distract from your subject matter.

The good news is that there are several reasonably priced and visually appealing backgrounds that you may employ.
- Sheets of White
A simple white backdrop is ideal for headshots since it allows the person to take center stage. Find an area with a lot of sunlight and place a simple white sheet in front of the subject to direct the light.
To ensure a wrinkle-free background, iron the sheet before you begin. Sew a hem around the sheet, from the bottom to the top. You may create this effect by sewing a folded edge in place while leaving both ends free for a curtain rod.
By the time you’re done, you should have something that looks like a curtain, but without pleating and with a pocket at the top and bottom.
Use an eyelet to hang a curtain rod from the bottom. This will make the sheet more stable by reducing its weight and allowing it to hang straighter.
Hang the blanket from the ceiling using hooks or an additional fishing line by inserting another rod through the top hem. Use a steam iron to remove creases from the sheet.
Toys Photography Ideas
- Consider Using Focus Stacking In Your Next Photo Project
“Focus stacking” refers to combining photographs shot at multiple focus points of the same subject. Photoshop or a comparable focus stacking program may be used to do this.
So when you combine many photographs, you get a complete picture, and each image should have a distinct focal point.
Keep in mind that you should snap each shot from the same posture and perspective.
- The Photoshoot Should Include Children
When it comes to taking images of children, you may be used to including toys in your subjects’ outfits and poses.
This time rather than concentrating on the child, you’ll concentrate on the toy they’re holding or playing with.
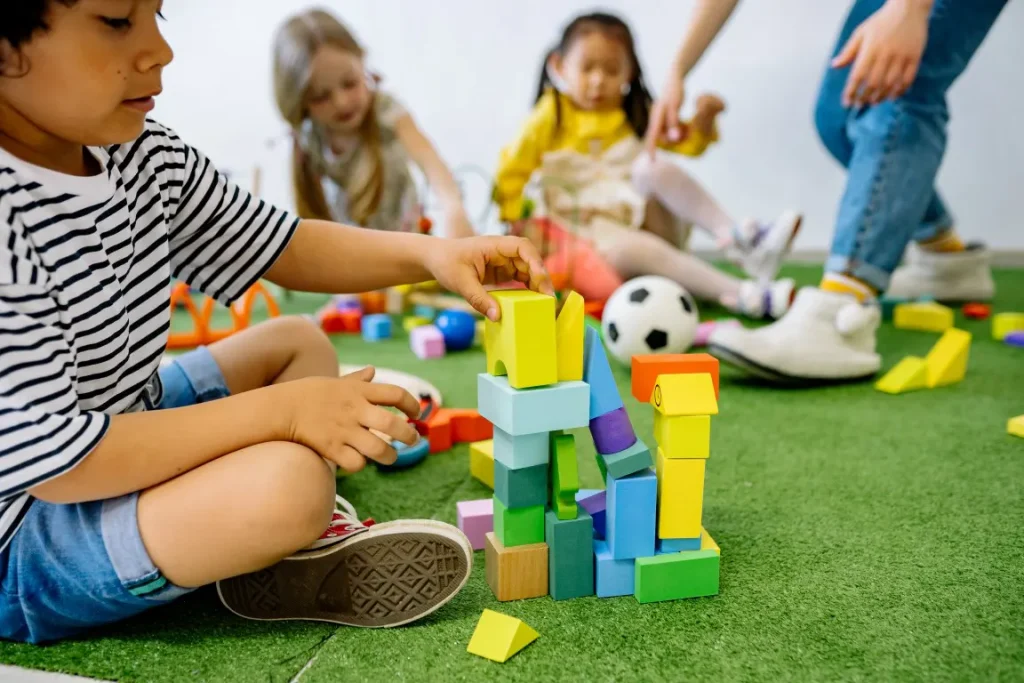
It will still be a beautiful portrait, but with a fresh point of view provided by the change in focus.
- Compose Your Techniques
When it comes to photography, the composition is the art of organizing the subject matter in a way that enhances the final image.
Putting a few toys and props close to one other isn’t going to do anything to wow your audience.
Besides that, do experiment with different product photography styles that are suitable for toys. Check out my latest article on product photography styles to learn more.
Conclusion
Toy photography may be a calm and relaxing style since you can take your time to tell a narrative and convey your passion for toys and photographs.
When it comes to toy photography, the subject matter is used to tell a tale that seems like a real-life or imaginary one, making it unique.
Toy photography has no boundaries, and, more importantly, you don’t have to keep to a story to generate comedy with your photographs.
Justin Parker is a professional photographer and has been in the industry since 2007. He attended the University of Georgia. Justin combines his passion for photography and his interest in writing to give life to this blog which talks about photography in order to help and inspire young photographers.