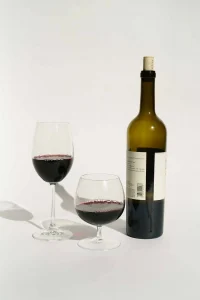
If you’re a photographer or aspiring to be one, you must already know how nail-biting it is to work with glass. Your work can quickly become as tricky as ever, with the main subject reflecting in the wrong ways.
The result will be a poor photograph because you don’t know all about the lighting and glassware’s reflective phenomenon.
Did you know that it’s even tougher to photograph transparent glass? So, if you dive in headfirst with no knowledge of this, you’re in for some frustration.
Don’t fret yet. I’m here to walk you through the entire process. By the end of this article, you will know every minute detail that goes into portraying the best and most challenging photographs with glass.
Tips for Photographing Glassware on Both Black and White Backgrounds:

The best-kept secret about glass photography is that you must never aim the light directly at the object. Shining light directly at the glass will have undesirable results with poor reflections and shadows. You must always clean your glassware before beginning too.
Let’s dive in a bit more to see how this works.
Equipment
You don’t have to break the bank and bag high-end light tents and studio lights for mere glass projects. The best catch is that many people DIY light tents at home for greater convenience.
You can also purchase two large poster boards of white and black color. A few things that you must ensure with the boards are that they must be stiff and sturdy enough to hold up on their own. You can also alter this product with a mat board or foam core.
Another top favorite piece of equipment is shooting tables which come with a metal frame and an acrylic sweep. If you don’t mind the splurge, this is an excellent investment as its usage is pretty versatile.
Setup On White Backgrounds
Start with a white Plexiglas below your glass object. Next, use block cards to abstain the light from hitting the glass directly.
This step is crucial for the reflections and lighting to hit perfectly. A few things to remember are that the lights must be behind the glassware, blocked with low ISO. Also, remember that you need to use a light tent for white backgrounds.
Don’t light up the sides of the light tents, so it comes clean in the picture.
Setup on Black Backgrounds
You’re required to follow the opposite techniques that you’ve seen with white backgrounds for shooting glass on black backgrounds. Place the object on a black background and point the light toward a few white cards.
You will achieve the highlights in your photograph from the reflection of these white cards. If you need thinner highlights, move them back or cut them into smaller squares.
On the top left, you need to place a reflector. In the middle, you need a round reflector so that the light can be allowed to bounce back, and on the top right, you need a board to create some highlights.
Again, you need to use a lighter tent for black backgrounds.

Easy Steps to Photograph Glassware with Minimal Gear:
Perhaps, you’re not willing to go overboard with your first attempt. I’ve got your back if you want a simpler setup with affordable gear and outcome.
First, let’s see what equipment you will require for these straightforward steps.
What You Will Need ;
- Camera lenses and body of your choice
- Two flash diffusers
- One trigger
- A few white cardboard
- Glassware
Now, let’s move to our straightforward steps.
Step 1 :
The first and foremost step while working with glass is to clean it properly. If there’s even a minute of dirt on the glass, be sure that your camera will pick it up. You can choose any glass cleaner and take the assistance of toilet paper to eradicate streaks and spots.
For dust specks, you can rely on compressed air.
Step 2 :
Now, you can move on to preparing the set. You can use an upside-down turned glass beneath the main glass object to create the reflection instead of an acrylic panel. It’s cheaper and hassle-free too.
One of the best benefits of this technique is that you can acquire a seamless black or white background without that troubling horizon line interrupting your art.
Step 3 :
Camera flashes might not work best for all projects as they have lower power than professional studio light settings. But the good news is that for your low-budget and easy setup, these will turn out to be affordable and more accessible.
Utilize the white cardboard as your backdrop and place your flash with a diffuser on both sides of the glassware. This will illuminate the scene nicely.

Important Glass Photography And Studio Setup Tips:
As you can see, different needs, budgets, and set up limitations can pose various challenges and ease of work. However, there are some set norms that you must abide by no matter what your setup is.
Let’s look at these tips that can lead you to capture a seamless photograph.
- Photographers often forget all the elements that go into the reflection of glassware. Remember to wear dark clothes and cover up all your equipment with a dark cloth to avoid reflections of yourself and the objects around the glass.
- Always choose a sturdy and flat table with less mess around it. Before you place the objects on this table, safe-proofing is necessary.
- With high-resolution cameras, the photographs can quite easily pick up fingerprints, smudges, and dust. In order to let your photography skills be seamless, always remember to clean the glasses.
- Ensure that you transition gradually while changing any elements or variables in your setups, such as the exposure, camera angle, or lights.
- Don’t forget to adapt the white balance according to your light setup as you go along the way.
- Use transparent Plexiglas shooting tables for an enhanced conductive background setup that quickly adapts to any lighting or hue.
- Placing your camera on a tripod is an absolute must. This will let you score consistent shots without any shaky photographs and at a low ISO.
What Is The Best Camera For Photographing Glass?
Users generally rave about the Sony Cyber-shot DSC H50 model. This camera has the best ISO settings, with multiple lighting level adjustments and a white balancing setting.
- It allows you to take shots in dimmed lights and is exceptionally user-friendly too.
- The Cyber-shot can help professionals and amateurs with its numerous adjustments that can tailor to diverse photography needs.
- It can shoot up to 9.1 megapixels and holds four gigabytes for the memory stick. Working with this all-rounder technology should be as smooth as butter because of its excellent options and various aspects of lights and camera adjustments.
Whether you’re shooting a close-up or distant glass image – nothing should hinder the process now.
Final Words:
So, there you go. The tips and methods that we’ve discussed are incredibly user-friendly, but most importantly, they will juice out the needed results every time.
If you’re a professional who’s looking to master this art, here’s your chance to rectify all the mistakes. To be fair, with glass photography, every microscopic detail counts.
If glass photography is your calling, I highly encourage you to give it a shot. With the tricks I’ve explained, once you test them out and acquire the desired results, there’s no stopping you!
Justin Parker is a professional photographer and has been in the industry since 2007. He attended the University of Georgia. Justin combines his passion for photography and his interest in writing to give life to this blog which talks about photography in order to help and inspire young photographers.