Shifting the telescope’s pointing slightly in various directions between shots is known as dithering to dither in astrophotography.
During the stacking process, this enables the removal of cold and hot pixels, cosmic radiation artefacts, fixed pattern noise, or even satellite or aircraft trails.
You can refer this video to more understanding about dithering.
Manual Dithering Astrophotography
Every exposure has the same hot pixels that are pixels that seem to be brighter than they are. Dithering alters the position of the stars in each frame by adjusting the telescope’s aim.
You will align or stack individual frames depending on the stars in each picture later after you have processed your photographs.
Whenever a frame is rendered, the heated pixels are moved around to accommodate this change.
Outliers in your photographs are eliminated using the Sigma reject stacking approach, which can be found in most image processing applications for astronomical images.
Put another way, and if you have ten frames, and one of them has a single heated pixel, the algorithm will use an average of the other nine frames to replace it.
You must have at least ten frames to use the Sigma method.
With dithering, your camera’s detector shows hot pixels that appear in the same spot, but the stars in the image change slightly from one to the next.
From frame to frame, heated pixels appear in a different location when the picture is aligned with the stars. This makes it possible to eliminate them with the help of the Sigma stack.
So, Manual dithering is a technique used in astrophotography to minimize noise by taking numerous exposures of a single object and gradually moving the camera’s location between each exposure.
By the way, If you need to know about Astrophotography noise reduction completely. I think this article is best for you.
How To Dither With The ASIAir
To begin, double-check that all of your cords are correctly attached. It would help if you connected the ST4 wire from the auto-guider to a “Guide” connector on your SkyGuider Pro or Star Adventurer.
It is necessary to connect the auto-guider USB cord to an ASIAir Pro. Make sure the ASIAir Pro is also linked to your specialised Astro camera.
To connect a camera to the ASIAir Pro, you need to use a USB cord. Also, check to see whether your camera is supported.
The Asia Pro does not support Sony cameras at this time; as a result, this solution would only work for those who own Nikon or Canon DSLRs.
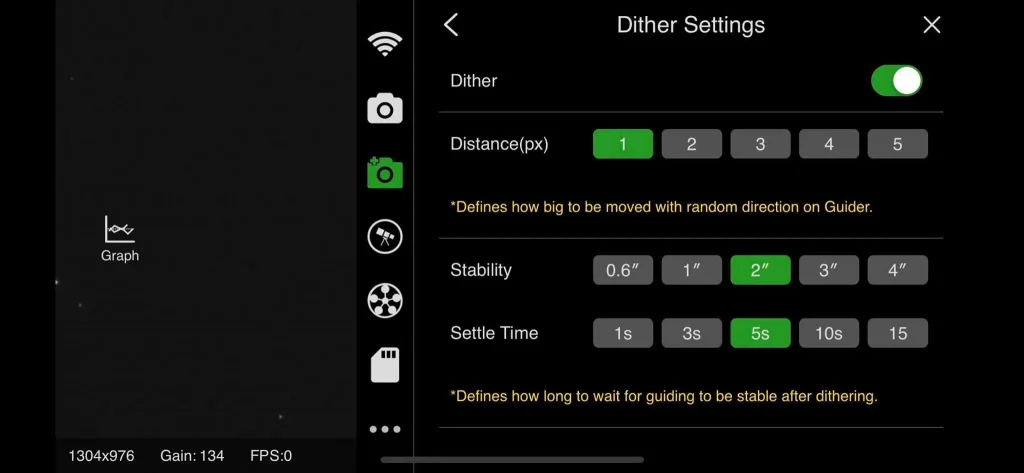
I may discuss dithering as soon as you have your item in front of the ASIAir Pro. On top of the Guide Settings, click on it. You will find “Dither Settings” towards the bottom of the Guide Settings section.
Step – 1
Auto-guide guider’s star will move by this many pixels. When using a longer focal length (70-200mm), you will need a more significant number, like 5 or 10.
Dithering cannot operate correctly if you do not move your camera around a lot.
At a focal length of 400mm or longer, a pixel intensity of 1, 2, and 3 is likely to suffice. For further information, we suggest doing your study.
Step – 2
Minutes, seconds, and decimal places are used to denote this figure.
As you can see, they are in arc seconds and correspond to your guiding graph’s inaccuracy.
Before shooting your next photo, how precise should your camera’s direct be? Asia Pro may take a long time to let your DSLR shoot a new picture if this setting is set to 0.6″, 1″, and 2″.
Step – 3
These values are in the range of one to fifteen. It will take a certain period for your DSLR or specialised Astro camera to wait until your auto-guider has adjusted to the error you selected above.
We utilise a value of either 3s or 5s there, such that We don’t have to wait too long between each shot.
How To Dither Using Stader Adventurer Pro/Skyguider
Step – 1
To play around with a SkyGuider Pro and Star Adventurer, you will need various hardware and software. You will need an auto-guider first.
Adding this camera to your star tracker will significantly improve its accuracy. I have written an article on budget astrophotography star tracker. I think you are already familiar with it.
Refer this video for more understanding.
Step – 2
Auto-guider cameras may focus on a specific object, such as a star or planet. While you are shooting pictures of this celebrity, it is keeping a close eye on them.
A command is sent to the star tracker if it detects that the star has strayed from the crosshairs. You can only instruct it to “Speed up!” or “Slow down!” if you use a SkyGuider Pro with Star Adventurer.
After a short pause, the star tracker returns to its original position in the middle of the box. The auto-guider will yell, “Speed up!” if the star starts to wander to the left.
The star track will increase its pace to bring the star back in the middle of the box.
Step – 3
After mounting the auto-guider and guide scope, you will need to install some software. In only four simple actions, PHD2 will handle all of your auto-guiding for you!
As soon as you have set up your gear and started taking exposures, you can start guiding. This is all you need to know! Having a laptop next to the star tracker is the sole drawback of this approach.
Backyard Nikon/EOS or ASIAir may be used on PCs or smartphones. It is possible to get a live preview and adjust the camera settings and shooting interval using these choices.
Dithering is the most significant feature of our picture-capturing programme!
The Dithering Using PHD2 And The Backyard EOS/Nikon
Step – 1
Both Backyard EOS & Backyard Nikon are popular apps for acquiring images. You may use your laptop as a remote control for your camera, whether a Nikon or a Canon.
You will need a USB cable to connect your DSLR to your PC to make this work. After connecting the DSLR to the laptop and the auto-guider to the laptop, the star tracker, you are ready to begin.
Step – 2
Start PHD2 first. Go to the bottom of your screen and click the little “Brain” symbol. Dither settings may be found on the “Global” tab.
Select “Random” as the game mode, and then check “RA only” in the drop-down menu. RA can only be verified manually on the SkyGuider Pro or Star Adventurer. Thus, that has to be done.
In Backyard EOS / Nikon, you can now change the PHD2 Dithering settings. Find PHD Guider in the Settings. To get the most out of Backyard EOS / Nikon, you may want to conduct your study.
Conclusion
If you use dithering, you will not need Dark Frames to take stunning photographs!
The Dithering process shifts the star track, and thus your camera, a little amount between exposures. The stacking process will be aided by this random movement dispersed over many photographs.
We are not receiving “real” dithering because the SkyGuider Pro or Star Adventurer could only Dither in RA. All the stars should move in a randomized spiral path between photos.
This is ideal. However, the lights will only move back up or left/right in our instance, not have both ways. ‘Since we are confined to RA alone, we aren’t reaping the full benefits.
The star tracker, auto-guider, guide scope, PHD2, and some form of picture collecting software are all required if you wish to attempt dithering. Alternatively, you may use an ASIAir Pro and control all your devices from a Smartphone.
Justin Parker is a professional photographer and has been in the industry since 2007. He attended the University of Georgia. Justin combines his passion for photography and his interest in writing to give life to this blog which talks about photography in order to help and inspire young photographers.