Underwater photos already look fantastic, then why do you need to edit them? Unfortunately, this question remains valid for those who are new to the world of photography and do not know the magic of all the editing apps.
However,
you gradually understand that raw photographs have to be edited because of the problematic situations around you that need fixing, like contrast, brightness, highlights, etc.
Well, before talking about editing, I highly recommend you to plan your underwater photoshoot well. Hence, you can get the maximum from editing without wasting much time.
For that, you can read my article about how do you look good in underwater pictures simple and easy tips. But, if you are planning a night under water photoshoot you can read my about how do you shoot underwater pictures at night.
Best Apps to edit underwater photos
There are several apps that you can download on your smartphones or laptops to edit the photos that you clicked underwater on the basis of:
- Level of expertise – beginners, Medium, Premium
- Ease in usage – Understandable features like contrast, exposure, brightness, clarity etc.
- Prominent results – HD photographs
- Add-on or special features – any feature that is not common to all, like cloud backups
If we compare on the basis of their prices, some free apps that you can download from the play store or App store on the contrary some apps have to pay for. The below list provides both apps that you can use.
| Free apps | Paid apps |
|---|---|
| Apple Photos (for iOS only) | Dive+ |
| Dive+ (Basic level) | Lightroom ($1.99) |
| Lightroom (Beginner’s level) | Photoshop Fix |
| Adobe Photoshop (Basic) | Affinity Photo – the US $19.99 |
| Snap seed (free) | Mextures (iPhone- US $1.99) |
How to edit underwater photos in Lightroom mobile?
Adobe Lightroom is getting some excellent traction from the audiences because of its versatile features and organisation of photos in the most efficient manner.
While you can take some time to understand how to edit photos on Lightroom, you can also follow a few tricks that work for every picture like:
- White Balance Adjustment – White balance will balance the overall pictures’ natural balance of colours.
- Cropping and scaling – Basic adjustments like cropping the image to get rid of unwanted objects or unevenness can be adjusted with scaling.
- Exposure – This feature would basically bring light to the picture; however, be careful not to ruin the pixels.
- White and Black feature – Whites and black of a photo can be distorted if the lighting isn’t sound underwater. Therefore, this feature would correct it.
- Shadow and Highlights – You can adjust the uneven shadow areas, and highlight areas you think need highlighting.
- Dehaze, texture and clarity – Dehaze enhances the detailing of the photograph and creates depth in the photo. At the same time, texture and clarity provide precisely what they have been named after.
- Sharpening – Any blurriness in the photo will get sharpened with this feature.
- Colour correction – Basic colour correction is crucial for the photograph’s colour balance.
- Contrast, vibration and saturation – Contrast is quite crucial for a photograph’s overall look and should be carefully adjusted without distorting the colours of the photo.
Vibrations and saturations are for providing warmth to the photo.
How to edit underwater photos in Photoshop?
- First of all, Import and save the photos before you start editing them.
- Now, open the saved copy so that the copy is available on your device.
- Remove the double layer from the picture. The double-layer makes the picture look blurred.
- Selectively adjust the sharpness to bring focus to the picture.
- Rectify the colours of the photo by going in the channel mixer. The next you should look for is’ Levels adjustment” to adjust the level of RGB in the picture.
- Improve the saturation and Hue levels of the picture.
- Contrast and brightness need to be adjusted to get a well-adjusted photo.
- Crop and scale the photo before saving the picture.
- Save it on your device.
How to edit underwater pictures on iPhone?
You can make basic edits on the default edit on the iPhone photos and correct several aspects like the contrast, exposure, shadows and highlights, as well as the saturation and vibration of a picture.
But, if you are not satisfied with the level of editing features in the iPhone, then you can download Lightroom on your iPhone or Snap seed for your phone.
Editing is easier and fun to do on Lightroom because of its versatile features at the most basic level.
By the way, the following video is a comprehensive guide to how you can plan an underwater photoshoot using iPhone 14 Pro.
How to colour correct your underwater photos?
Every time you click a picture underwater, the colour looks different from reality. This phenomenon occurs because of the present lightening underwater and the time of the day you went for the shoot. Therefore, if you wish to colour correct your pictures, then you need to follow the steps below:
- Use the white balance feature and point on one point of the picture to colour correct it.
- Adjust the saturation and hue of the picture to get a balanced colour in your photo.
- You can even adjust the RGB colours of the photograph from the white and black options.
- Save the picture in the highest resolution.
Why are my underwater photos green?
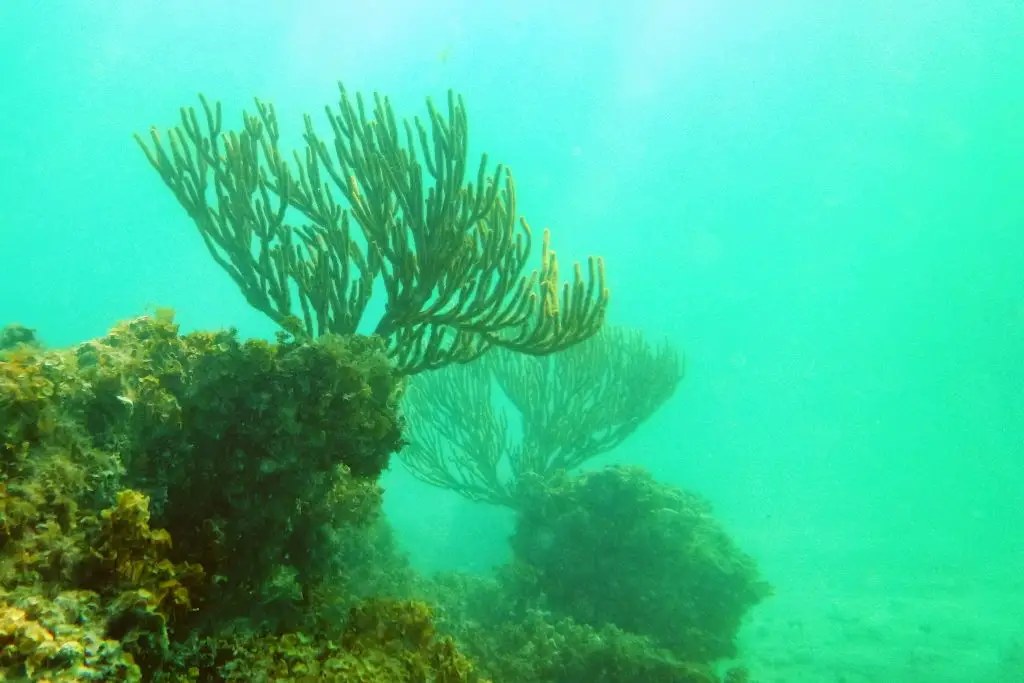
Above is one of the photos I took as a beginner. At a glance, it’s greenish; which is one of the main issues with under water photography.
Back then, I was wondering what makes the sea impart only green or blue colour? So, I did some research and find out the reason.
The most definitive answer that I can give you is that underwater colours are always either blue or green because of the sunlight.
The sunlight is white, containing 7 colours in its spectrum, which means that all colours reach the water.
However, red and orange get absorbed deep in the water because of longer wavelengths. But greens and blues have a short wavelength so that you can see them right at the top.
Underwater photo filters
Professional photographers use underwater red filters now and then since they subtract the wavelengths of colours from the spectrum of light.
However, you have to take higher ISO pictures with a wide aperture and Shutter speed at 1/1600s to get enough light in the picture.
Filters do not help much in clicking the most amazing photos; however, just colour correct the area around you so that camera catches on only certain factors of the photograph.
Make sure that the subject you are trying to shoot is shining brightly under the sunlight. Also, it would help if you did not turn to flash in desperation, as flash could ruin the whole composition of the photo. Instead, use ambient light to get continuous lighting around the subject.
Remember to shoot in High ISO, High shutter speed and a wide-angled aperture to get the most majestic photograph.
Here are some photo filters you may use when editing photos
Blue Water Filter – Use to balance the color of blue water by removing the green tint from underwater photos.
Green Water Filter – Remove the blue tint from greenish water, providing more natural and true-to-life colors.
Red Filter – Used in deeper water to restore the red and orange hues that are lost as light penetrates deeper.
Magenta Filter – Best for shallow dives or snorkeling in tropical waters where there is an abundance of red and pink corals.
Yellow Filter – Used in greenish water and helps to improve contrast and clarity in the image.
Polarizer Filter – This minimizes reflections on the surface of the water and enhances the overall clarity of the image.
Neutral Density (ND) Filter – Reduces the amount of light penetrate the lens, allowing for longer shutter speeds and smoother, more natural-looking water motion in your images.
Graduated ND Filter – This balances the exposure between the sky and the water.
Conclusion
We read about every possible app that you can use to edit your underwater photographs.
However, it would be best if you practice before settling on the perfect picture as the best-edited photos.
Work off on free apps and master the art of professionalizing your pictures and then purchase the paid apps so that you can improve your photographs more than before.
Also, remember to read about essential pointers that you must remember before you click pictures and edit them. The most important thing that you should remember is to click RAW quality photos so that you can get the best edit from them.
Justin Parker is a professional photographer and has been in the industry since 2007. He attended the University of Georgia. Justin combines his passion for photography and his interest in writing to give life to this blog which talks about photography in order to help and inspire young photographers.